After recently grumbling about the smoggy haze in some of my photos from Beijing, Gary B. sent me a tip from Luminous Landscape about how to tweak contrast to make subtle details pop. The original article was geared to making subtle highlights like shadows standout for printed photos, but it seems to work for improving the look of images taken on a couple hazy mornings in China. The trick involves using some kind of Unsharp Mask filter, which as defined by the Photoshop Elements help file is a technique for giving the illusion of greater detail in an image (sharpness) by increasing the contrast between the light and dark areas of the image. Photoshop, Photoshop Elements and Paint Shop Pro all have an Unsharp Mask built in. I haven’t found a good freeware plugin solution for this particular technique if you happen to use some other tool.
I’m stepping through the process here in Photoshop Elements, but the process is very similar using virtually any other sharpen filter with an Unsharp Mask. After opening your image in the editor, locate this tool from the menu by choosing Enhance > Unsharp Mask (or from the Sharpen Filters and choosing Unsharp Mask in older versions of PSE).
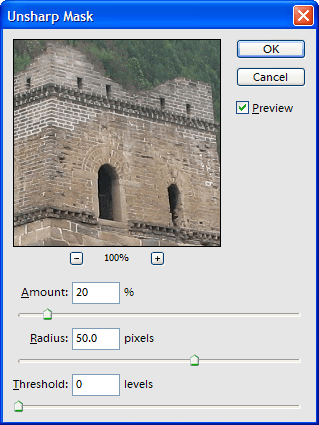
There are three settings here to work with:
Amount determines how much to increase the contrast of pixels. We’re working with subtle highlights here, so for most cases you won’t want to boost this by more than 20-30%.
Radius is used to identify how many pixels around edges to sharpen. For sharpening contrast in the localized fashion were working with here, a number between 40-70 seems to work well depending on the image, because you can really make edges stand out.
Threshold determines how far pixels must be from surrounding area in order to be considered an edge. By leaving the threshold at 0 the entire image is sharpened. Increasing this number to anything greater than 0 seems to make the effect useless for what we’re doing here.
In my two examples, the original image is on the left. The Unsharp Filter is applied in the image on the right.

In this example I used the following settings:
Amount = 30
Radius = 50
Threshold = 0
A number of things grab me about the changes here. The pillars stand out more. The roof has the appearance of more detail. Even the wall in front of the building seems to have a little more character. I’m sure the settings could be tweaked further for a better result, but I was impressed by how little effort was required to make a few more details stand out.

In this example I used the following settings:
Amount = 25
Radius = 50
Threshold = 0
The big thing I notice here is that the trees have more edges to them and the doorways on the tower jump out a little more. The original image was flat.
The ideal scenario remains having great lighting in the first place. There’s no replacement for having a clear sky or an overcast sky with no haze.
For more on this technique, you can also check out the Luminous Landscape tutorial.