Recording audio or editing video on your PC is resource intensive. Anytime you plan on recording, whether it’s a narrative description for a home movie, conversion of your favorite old records, or the monologue for your next podcast, make sure your computer is optimized for recording before you start. Some of the tasks described here cover things that are good system maintenance practices and some are things specific to making sure you get the best recording possible out of your PC. All of the recommendations are designed to help eliminate your computer hardware as a possible trouble spot in the audio recording or video editing process.
Turn off Unnecessary Applications – IM clients are useful communication tools but are better left shut down when doing system intensive multimedia maneuvering. Turn off other background applications like anti-virus, firewall and spyware detection tools. Yes these are important for safe Internet browsing, but you shouldn’t be connected to the Internet while you are recording. If you feel uncomfortable with disabling these services, unplug your network cable while you capture video or record audio, there are no known nasties that can infect a disconnected computer (If you need information from removable disks, scan them before shutting down these services). When you’re done recording, re-enable all these tools.
Shutdown Unnecessary Services – Several applications are known to run in the background even when you don’t have them open. This consumes extra memory that could be dedicated to your video or audio project. The software companies do this so the apps load faster when you click on them, but you don’t want extra stuff running during processor and memory intensive media projects. One common culprit is iTunes, which runs two helper apps in the background waiting to launch if you dock your iPod (even if you don’t own one) or click on a music file. On the other hand, there are some services your system needs to function, like lsass.exe. explorer.exe and alg.exe. Don’t terminate any of the processes Windows requires to function or you will be rebooting. If you aren’t comfortable shutting processes down, this might be a step worth skipping.

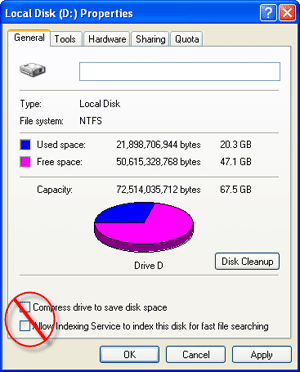
Say No to Disk Compression – Saving your audio files in a compressed format like WMA or MP3 may be a necessity for distribution but you don’t want to compress your storage space. Everytime a disk write operation is performed the disk must temporarily be decompressed and recompressed when this feature is turned on. This not only consumes additional system resources it may damage your audio and video files.
Disable the Indexing Service – Indexing is supposed to make it faster to find files on your system. Whether indexing is turned on or not, Windows is not a very capable search tool. Save the system resources consumed by Indexing for your multimedia processing and turn off indexing. If you need an effective search tool, download the free Copernic Desktop Search. Copernic does index your files, but you can configure it not to hog the system while you’re using other applications and it finds things far more effectively than the built in Windows Search.

Defrag Your Hard Drive – A fragmented hard drive can cause a variety of problems for large audio and video files. If you plan on working with audio and video editing applications frequently keep your system optimized. Defragging regularly is a smart habit to get into regardless of your audio and video habits. You can rely on the built-in defrag tool or upgrade to something like DymaxIO or DiskMagik.
Turn Off System Sounds – All those warning beeps and event sounds that make noise when you click things can show up in your recording depending on how things are configured. Playing system WAV files has also been know to cause a shift in sample rates with some sound cards, which throws off the quality of your audio recording. Configure the system for no sounds from the Control Panel > Sounds and Audio Devices. On the Sounds tab, select No Sounds as your Sound scheme.

Optimize Video Performance – By default Windows XP enables lots of cute features designed to make the visual appearance more polished by adding drop shadows, fades and animated effects for window changes. These all increase the load on system resources but do nothing to improve the audio and video recording experience. You can turn all these features off, displaying what looks more like Windows 2000 or Windows 98 by opening the System Properties (WinKey+Pause Break), Clicking the Advanced Tab and clicking the Settings button in the Performance Section. With the Visual Effects tab displayed, switch to the option to Adjust for Best Performance, turning off all those extra appearance effects.

Control Sound Card Latency – If you’ve ever talked on your cell phone and heard your own voice echo in the earpiece, you are familiar with sound latency. Latency in sound recordings is virtually impossible to fix, so it’s better to configure your system to deal with it ahead of time. The Advanced Tab of the Performance Options contains a section called Processor scheduling. The two options give priority to your applications or to background services. For best performance of your sound card, setting this to background services will help reduce potential latency issues. This is particularly helpful if you use MIDI instruments or want to record softphone calls through a service like Skype.

Store Project Files on a Second Drive – Your system drive is busy handling the tasks that make Windows work properly. It’s likely the place you installed your audio and video editing applications. Use a second drive (either internal or external) to store the media for your projects, allowing the second drive to handle all the write-intensive operations of importing video from a digital video camera or recording an audio signal from a microphone or instruments.
You still have plenty to keep in mind to achieve a quality audio recording or video project, but following these simple steps will help prepare your system for the opportunity to succeed in making great multimedia.


