Recording voice audio can be a complicated process, but it doesn’t need to be. I’m getting frequent questions about how to record a podcast and ultimately share the end result with people. Ideally, you want to invest in some audio recording gear to make your podcast sound good, but to get started, you don’t need anything fancy.
Required Tools:
An application to record your podcast
For this, I recommend starting with Audacity. It’s free. It works for Windows, macOS and Linux users. Audacity offers a solid complement of editing features. And it outputs MP3 format audio for distributing your podcast.
Download and install Audacity before you get started.
To save recordings in MP3 format, you also need a copy of the LAME MP3 encoder which is available through a variety of download sources.
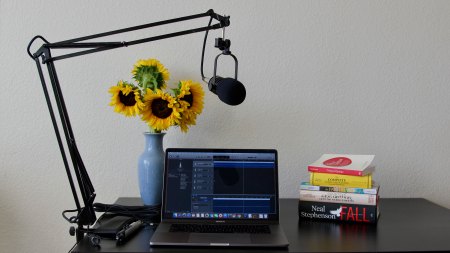
A microphone
To test out the process, the built in microphone in your laptop or the microphone that’s part of headphones like Air Pods is a good place to start. Eventually, you will want to purchase a higher quality dedicated microphone, like the one included in this podcasting bundle, but start with something cheap to be sure you plan to stick with podcasting before investing a ton of money. If you don’t own a microphone at all, Amazon has several microphones under $25 as a starting point.
Headphones
Headphones are important because you need to monitor the levels of your recording but you don’t want to have the sound coming from a set of speakers being recorded by the microphone. Ideally, using headphones that cover your ears (or something noise cancelling like Air Pods) will do the best job of isolating sound in your recording from other audio distractions, but even the headphones that came with your smartphone will work just fine.
Before You Record
There are a few steps required in setting up to record a podcast.
- If you are using an external microphone, content it either to a USB port or to the microphone-in connection on your computer.
- Make sure your headphones are connected to your computer.
Configure the microphone as your recording source.
Either double-click the speaker icon in the system tray or go to Start > Control Panel > Sounds and Audio Devices. Click the Advanced button in the Device Volume section of the Sounds and Audio Devices control panel.
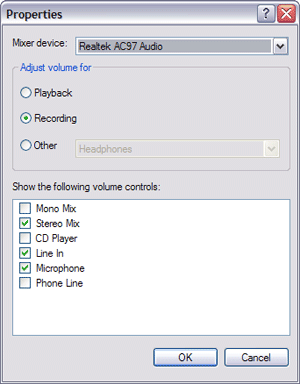
With the Volume Control open choose Options > Properties from the menu and click the button next to recording.
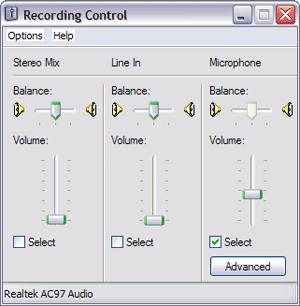
Make sure the Select box under the Microphone column is checked and the volume is above zero or you won’t be recording anything. Leave the Recording Control open so you can make adjustments during the recording process.
If you didn’t already install Audacity, make sure you do it now.
Preparing to Record
Open Audacity and then open the preferences from File > Preferences
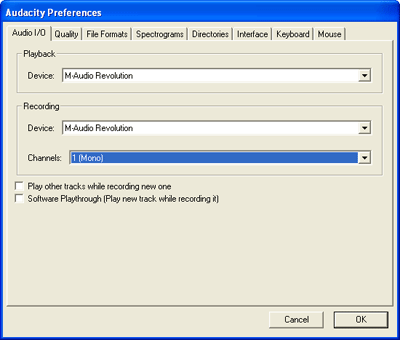
On the Audio I/O tab, verify your sound card is selected as the device for both playback and recording. In the channels dropdown box under Recording choose 1 (Mono). Unless you’ve got two microphones stereo simply doubles the same track, making the file size bigger.
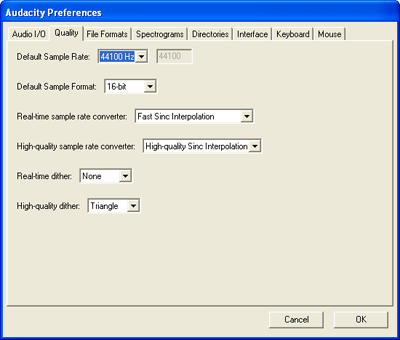
From the Quality tab choose 44,100 Hz as the Default Sample Rate and 16-bit as the Default Sample Format. Audio geeks may argue that higher sample rates and formats are better, but for introductory purposes, 44,100 and 16-bit will work admirably.
The File Formats tab controls the output formats for your audio. To avoid accidentally overwriting your audio files, select Make a copy of the file before editing under the When importing uncompressed audio files into Audacity options. Choose WAV (Microsoft 16 bit PCM) as the Uncompressed Export Format, Leave the OGG Export Setup untouched and follow the instructions on MP3 Export Setup to configure MP3 output.
Close the preferences by clicking OK.
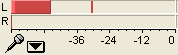
From the main program window verify Microphone is selected as the recording input option on the Audacity Mixer Toolbar. Click on the microphone icon on the Audacity Meter Toolbar to turn on monitoring. You should see a red level indicator moving slightly as it picks up room noise. Talk into the microphone and make adjustments to the volume until you get a level that bounces close to the top of the right edge without ever turning the far right solid red (which indicates you are clipping the audio). Once the level is adjusted, you’re ready to record.
Push the record button and start talking. When you finish recording press the stop button and save the file as a WAV. The save is important so you don’t lose your recording.

At this point, it’s time to edit the audio file or save it as an MP3 for distribution as your first podcast. Editing will be covered in a later tutorial. To save the file as an MP3, open the preferences again, choose the MP3 bit rate on the File Formats page (generally somewhere between 32 and 64 is good enough for voice audio, without making the file size too big). If you didn’t setup the LAME encoder already, follow these instructions to configure it now.
To publish your podcast, read the tutorial on Publishing Your Podcast.