I want to help my nephew stream a pre-recorded DJ session via WME but have no clue how to accomplish it. The recording part I can do. I want to stream the file so it loops when it is done. Is there a way to play the file with WMP and have it loop and stream it over the internet?
Setting up an audio stream using Windows Media Encoder is relatively easy. If you are planning to stream the file from a computer at your house, the tricky part is having enough bandwidth for everyone who wants to listen to it. If you stream the file from an online hosting service, the sky is the limit in terms of how many potential listeners your stream will support. More listeners translates to more money for hosting and bandwidth, so how many simultaneous listeners might be limited by your wallet. The initial setup requires a few steps, but you should be listening to music on the patio in a matter of minutes.
Getting Windows Media Encoder
If you don’t already have Windows Media Encoder, the free download is available.
Once the download completes, install Windows Media Encoder 9, accepting the defaults prompted by the installer. With the install complete, launch Encoder by clicking Start, All Programs, Windows Media, Windows Media Encoder.
Configuring Your Audio Stream
The New Session window appears offering several wizard choices. Select Broadcast a live event and click OK.

Audio and Video device options are the first step in configuring broadcast settings. Since this is an audio only stream, uncheck the box next to video. WM Encoder uses the default sound card on your system automatically.

Next configure Broadcast Method. This tells WM Encoder the broadcast is being sent to a Windows Media server or broadcast locally by your computer. Choose Pull from the encoder.

Next the Encoder sets the broadcast port for the stream. By default the port number used by Encoder is 8080. In most cases, accept the default. Think of ports on a computer as being similar to extensions in a corporate phone network. Dialing the main company phone number gets you to the front desk, just like typing in a computer’s IP address (in the example below http://192.168.0.9) gets you to the index page of whatever Website might be on the computer. Adding a colon followed by a port designation to the end of the IP address tells the computer you are looking only for information available at a very specific location, just like dialing a direct phone extension connects a specific employee. Port 8080 is commonly used for streaming because Website traffic is delivered to your computer on port 80, making 8080 easy to remember for techies. Notice WM Encoder supplies the broadcast URL below the port selection. These URLs are used to connect to the broadcast from the Pocket PC (or any computer on your home network). Click Next after deciding on a port, making note of the broadcast URL.

After selecting the port, it’s time to decide on a broadcast quality level. Because you are streaming this out to the Web, keep in mind the amount of bandwidth you have available. A DSL or Cable connection general has 384-768 kbps upstream bandwidth available, which gets used for things like FTP, sharing files through BitTorrent and streaming audio or video data to other computers. It’s also important to account for the ability of people listening to the stream to tune in. Having tested a wide variety of streaming options, I find the FM quality audio setting to be a fair trade off between audio quality and consistent connections. Click Next after making a selection.

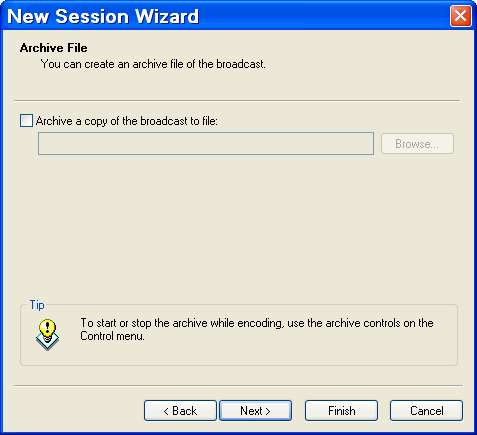
The next screen offers to Archive a copy of the broadcast to a file on the computer. This is useful if you are broadcasting live performances, but isn’t necessary when playing a pre-recorded file. Leave the box unchecked and click Next.

WM Encoder offers metadata fields to provide information about the broadcast. This is useful for broadcasting original content to the Internet, so listeners have details about the stream. Fill in the information or leave it blank, and then click Next.

Click Finish on the Settings Review screen.

The first time you setup a broadcast, Windows Media Encoder warns that any IP address on your network has access to the content of the broadcast. Since you are streaming to the Internet, presumably you want people to be able to listen.

Before you can stream the file, you need to make a minor edit to the settings you just configured. Click the Properties button on the toolbar, change Source from: to File and browse for the location of the audio file you want to stream. From the At end: dropdown list, choose Loop.

Testing Your Audio Stream
Click the Start Encoding button and Windows Media Encoder will start cycling through the file. You can test the connection locally by putting the local IP address for the streaming computer in the browser of another machine to listen like this:
http://192.168.0.9:8080
For people who want to access your stream from the Internet, use the IP address assigned by your ISP followed by :8080. If you don’t know what your IP address is, the easiest way to find out is by visiting this page I set up to show you your IP address.
Configuring Your Router
There are a few tricky parts to making the stream available for live broadcasts. If you have a router connecting your PC to the Web, you need to forward Port 8080 on your router to allow people connecting to the ISP-assigned IP address to receive your stream. The process for forwarding a port varies by router manufacturer, but in general there are a similar series of steps. Linksys refers to the port forwarding page as Applications & Gaming, some other routers refer to port forwarding options as Virtual Servers.
To forward port 8080, you generally need to enter the following data:
Application or Description field: Windows Media Stream
Port Range Start: 8080
Port Range End: 8080
Protocol Type: Both (or TCP if a both option isn’t available)
IP Address of your PC: You can find this by typing ipconfig at the command line
Enable: check a box to enable the port forward
In some cases you also need to repeat the Port Range Start and End for the local machine (often referred to as Private Port).
For optimal security, it’s a good idea to login and uncheck the Enable box if you ever shut the stream down. That way if someone happens to be scanning your ports, they won’t find an opening. It’s an extra step that requires only a few seconds for additional security.
Promoting Your Stream
By promoting your stream, I simply mean letting people know how to find it. The official address for the stream will be http://X.X.X.X:8080 where each X is replaced by the numbers filling that particular octet of the IP address assigned by your ISP. Put a link to the stream on a Website or blog to let people know how to find it.
It is likely easier to register a domain name and point http://www.yourdomain.com:8080 at the stream. That way, if your IP address ever changes, or you decide to host the stream somewhere else, you don’t end up confusing listeners.
What If My ISP Changes My IP Address?
This is another tricky part to this configuration. Not every ISP offers static IP addresses. If you plan to stream from home, see if you can get one. If your ISP changes your IP address frequently, there are two ways to deal with it. You can sign up for a dynamic DNS update service, which will automate the process of keeping your IP address synchronized with whatever domain name you are using to promote your stream.
Stream Hosting Services
If hosting an audio stream on your home computer is starting to sound too complicated, you can pay to have the stream hosted for you. Spacial is a great service for hosting Windows Media Streams. The cost per month depends on the number of simultaneous listeners you want to support. 30 simultaneous listeners at approximately the same audio quality level described in this tutorial costs $20/month.
How to stream a live audio file?
Article by:
7 minutes
Image Credit: Some featured images on this site are stock images purchased from Depositphotos.


