With the December 4, 2007 update, Xbox 360 now directly supports streaming DivX AVI movies from your desktop. All you need is Windows Media Player 11 or the Zune software. I personally prefer Windows Media Player 11, because it also supports playing back Amazon Unbox videos on the Xbox 360.
Here’s what you need to do to configure your computer to share video, music and photos with your Xbox 360. Make sure your Xbox 360 is turned on and connected to your home network before beginning.
Click the Now Playing button at the top of the Windows Media Player 11 interface and choose More Options. On the Library tab of the Options, click Configure Sharing.

Check the box next to Share my media to, then select your Xbox 360 and click Allow, so that there’s a check mark on the Xbox 360 icon instead of a warning sign. Note: If you get an error message about your network, follow steps to set your network from Public to Private.

On the Media blade on your Xbox 360, choose Videos, then hit the X button to Change Video Source. Select your computer from the list of choices. You can now browse your computers music, photos and videos.
Depending on how your files are encoded, you may be prompted to download an additional free update for AAC playback with some files.
Streaming DivX Movies From Windows Media Center
Lack of DivX support remains one of the top gripes of Xbox 360 owners. There’s a new and simple way to stream DivX, XviD, etc to your Xbox 360 using a Windows Media Center add-in. Follow the required steps and you’ll be playing back your entire DivX library from any Xbox 360 connected to your network.
The required app is MCE Video Encoder, which functions as both a standalone streaming app and add-in for Windows XP Media Center Edition. You also need the official DivX Player from DivX installed on your system (the third-party stuff won’t help).

After downloading and installing the desktop portion of MCE Video Encoder, you need to enable the MCE plug-in functionality by selecting Tools > Install Media Center Add-ins. This runs a batch file to add Media Center Video Encoder functionality to your Media Center.

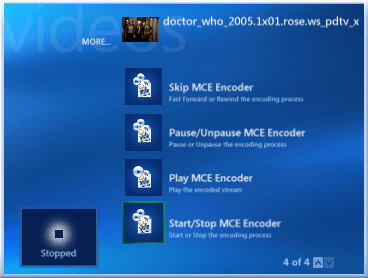
Once you add functionality, simply locate a DivX or XviD file on your hard drive by browsing through the My Videos list on your MCE PC. Select the video you want to play and press the Info button on your remote to bring up the options menu. Choose More form the list.

Next choose Start/Stop MCE Encoder and accept the required defaults for playback.

After starting the encoder click Play MCE Encoder.
To get the video to playback fullscreen on your television you need to select the preview window in the corner of your MCE interface because MCE Video Encoder doesn’t do this by default.

The app also includes a fast-forward feature to skip ahead in the video and a pause feature to pause playback of the encode.
On my MCE machine I never use the actual DivX player – everything plays back through Windows Media Player or the MCE interface, so I hadn’t ever launched DivX. This caused MCE Video Encoder to choke because there’s a welcome screen in the DivX Player you are required to click through in order to actually watch videos. After I launched the DivX Player independently and clicked through the welcome screen, MCE Video Encoder worked without a hitch.